Saturday, September 27, 2008

Quotes, Estimates, and Proposals, a behind the scenes look

Another day, another estimate! Well, that's good news for us, meaning good business. But, you might not realize how much time can be involved in "working up a quote". It's something that has to be done, but is a rather involved process.

You've already seen some behind the scenes pictures of the construction of a window treatment (and I do promise the final picture very soon), but you haven't seen the paper work involved. I know, paperwork is almost a bad wor
d to a lot of people (me), but it is necessary in all businesses. I won't show the actual estimate from Quickbooks, but the paperwork that is done before we plug in the $$.

Drawing my come easy to some, but to draw to scale is time consuming. We have a wonderful computer program that really makes the job fun. We are also able to show a nice rendering to the customer so they get a preview of what is to come. I did talk a little about computer renderings in January of this year.


The renderings are important to the homeowner, the installer, the fabricator and to us at Madison Lane. Everything is on paper, and hopefully there are no big surprises. Of course fabric drapes the way it wants to drape, and colors can seem different by looking at them vertically instead of horizontally as they may have been viewed in the books. The renderings also accompany us on the installations so the installer can see the rod placement and measurements for the treatments. Of course, all measurements are rechecked on site, but just seeing it beforehand saves time.


The above drawing may not look like a coverlet, but the placement of the two fabrics warranted a drawing. This was faxed to our bedding fabricator and she confirmed by phone and discussed the little details that cannot be seen in the drawing. This will be her pattern when the fabric arrives.

Visit the Minutes Matter website, you'll enjoy just looking around the website. They even have a 30 day free trial available if you want to try it out for yourself!

Saturday, September 20, 2008

Bedding: ready made and custom made

There are many ways to get a unique look for your bedroom. There are some great "ready made" bedding ensembles that can be mixed and matched within their own line. There's also "custom made" bedding that sometimes is necessary to fit an oversized bed and can coordinate with the drapery. We like to mix custom with ready made items for a couple of reasons: can save time pulling the look together, and it usually can save some money. Of course there are exceptions to every case, but I'll show you some examples.

Below are some pictures from a new company you'll soon find at Madison Lane Interiors. Home Source International features bedding made from bamboo! It was being raved about at the Dallas Market and apparently is selling quite well. Our rep is coming in this week and we can't wait to place an order.

We will have another bed in the store very soon to show off the new bedding we'll be stocking. We'll be posting a picture of our own rendition very soon. Another item we can order will be mattresses and custom upholstered headboards, so please come by and see them in person.

If you need a special size coverlet because of your bed style or mattress size, we will take care of it! This bedroom required all custom bedding. The coverlet was quilted around the design. The three euro shams have brush fringe and a contrast back with buttoned opening. The king shams have a three inch flange trimmed in gold silk micro-cording. The two occasional pillows are from a third coordinating fabric and have a small gold silk flange on the edge.


Here are three custom made pillows waiting to be delivered. The blue silk was chosen to match the blue silk drapes. You can easily imagine how the room will have a new look just by their addition.

Stop in and let us help you personalize your bedroom.

Sunday, September 14, 2008

How to Dress a Window: Part III

If you remember the last picture from our series, I was drawing the pattern for the valance. I thought I had my measurements perfect, but knowing it never works out that way, I try to pin fit the valances. In this case I had the cornice to pin to, but in most I pin directly to the table and lay the measuring tape just above to check my size. If you sew yourself, or if you watch the TV show Project Runway, you've seen this done but with clothing.
OK, look closely at the pins in the middle, obviously my measurements weren't what I thought! Also notice the jabots (sides), they looked a little too full so I took the scissors to the pattern and cut out some bulk. Two other places I cut out extra were the horns and the top of the horns (just a little too tall). Now back to the drawing board to cut a new pattern.


After the new pattern was drafted and given a quick check by pinning up again----the actual fabric was cut. Look closely at the blue fabric being pinned onto the striped fabric. Remember those bias strips I cut in the beginning? There is a tiny cord inside there that will give a nice finished edge to the bottom of the valance between the face fabric and the lining.


The cording is sewn on (note that the pattern is now used as the interlining and sewn with the striped fabric). The picture above is showing you the gold dot fabric that will be the decorative lining to this valance. By laying the fabrics face-to-face, I can cut around the lining, pin to secure, and more to the sewing machine to sew all around the edges. I do leave a little section on one side open so I can turn it inside-out.


What is this mess? It's turned inside-out! This can be time consuming. The edges and corners all have to be turned flat so everything can be pressed. Many curved edges must be "clipped" inside the seam so there won't be puckering on the face fabric.


What a difference some ironing makes! Can you see the tiny blue edge on the left? That's the cording showing and if I had a close-up you might actually see something. The top won't need it in this case, I have a larger piece of covered cording that I will be tieing around the pleats and across the top of the cornice. The tassel fringe is being ironed on with a special tape. It fuses the fringe to the fabric for a nice flat appearance. The ends are hand stitched to prevent fraying and to stay secure next to the edge.

A few strategically place staples will hold the valance in place. I'll show you the final picture after the valance is installed. Keep watching.


Wednesday, September 10, 2008

The falling leaves . . . .

Talking about leaves makes me think of Fall. But if we were already in the dead of Winter my mind might wonder to Spring, so I guess leaves are a relative thing, huh? I can tell you what leaves are in the decorating business and that is HOT. What is it about them that we find so appealing?


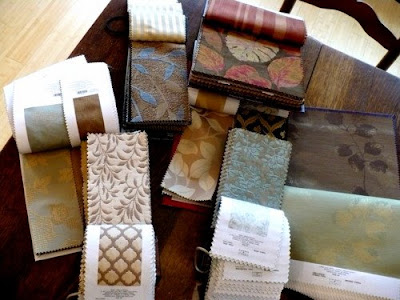
This is just a random sample of our fabrics with a "leaf motif". They are in all colors, sizes and textures. I think leaves have a calming effect on people.


I know you are zeroing in on the heart necklace and green box! Look behind and note the black and whte canister lamp (yes, there is a light in there). The branches and leaves would qualify it for this blog entry.


Boxes are another HOT item for Madison Lane. We have the leaf boxes available in two sizes, along with several other styles and sizes. They are a great gift for guys---remind them to put their loose pocket change and wallet in there instead of on top of the dresser!


We love this embroidered linen pillow. It definitely has the colors of Fall.


If you haven't incorporated some leaves in your decor, come by the shop, I think we can find some for you!

Saturday, September 6, 2008

How to Dress a Window: Part II

Now the work/mess begins. There's cutting, recutting, stapling, pulling out staples, drawing and of course redrawing! Now I'm sure many people can do the same window with only 3 of the above steps, but it just doesn't work that way for me.


I did forget to show you the giant roll of batting I have in storage just for cornice projects. You can barely see the batting on the front and sides of the cornice (built from the 1x4's and air nailer). I like to add lining on top of the batting so the actual fabric goes on more smoothly. I know this particular window treatment really doesn't show the cornice since the valance hangs on it, but it just gives a more tailored look if it's padded.

The cornice starts looking a little better with the fabric going on. I know it looks really short, but you'll see later why it doesn't need to be any larger. It's really just taking the place of a decorative rod. The triangle of fabric behind is folded so bias strips of fabric can be cut. I used two different sizes of cording on this project. One was very small just to go along the outside edges of the valance to give a finished look to the bottom. The other covers a larger cord that will be used to go across the top and around the pleats.


Now that I have some of the "dirty work" out of the way, I pull out a long piece of lining onto the table to draw my valance pattern. This lining is a light weight blackout type, that will also be used in the valance to prevent the fabrics from showing through. I didn't want to see stripes through the back side and dots through the front. This step is called interlining, but many use a flannel for this. I do for most, but these fabrics didn't require more plushness, but they did need something to block light.

The next post will show how I "fit" the valance before cutting the real fabric, sewing them together and some steps inbetween.

Friday, September 5, 2008

Put your white shoes on the shelf . . . it's Fall!


Did you learn the rule "no white shoes before Easter and after Labor Day"? I don't know if it still applies, but old habits die hard! It is time, however, to dress your home for the Fall season. Madison Lane has new inventory coming in every week. The fall season is the time for a splash of different colors. Not just the golds and oranges we usually like to throw around, but how about mixing in some bright blues, apple greens and soft browns?


Well, what do you think? The rich brown really makes the other colors pop, but keeps the bright colors from becoming too bright for fall. You might make out a couple of pillows are actually considered Christmas pillows, but what a great way to tie in the two holidays!


OK, is this more like something you expected to see? Well, we have that, too.


And this one even smells just as good as it looks. We have a new line of botanical potpourri. It's from the Judy Havelka line of room fragrances and botanical products. If you have a container already, bring it in with you and we'll help put the layers in for you. We do have some beautiful glassware to choose from if you don't have your own, too! We have several fragrances to enhance the botanical elements, and the rose hips already have a wonderful marmalade fragrance that compliments all the others. We first saw her products at the Dallas Market on our first buying trip. We never forgot the great look and smell of the product, so it was first on our list of new Fall items to purchase.

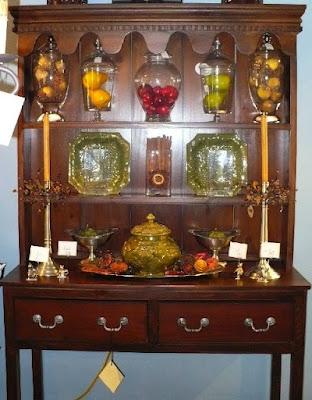
Here's our display so far, and with more on the way!

LinkWithin

Blog Widget by LinkWithin